
Even though we’ve just come through months of heavy holiday eating, we still crave those warm, traditional comfort foods that always taste the very best during this colder time of year. Eating soups and stews warms and nurtures us at the same time. Often all that is needed to nicely complete the meal is a good salad and some warm bread.
I love all winter squash, and my favorite of all is a Japanese version called kabocha, which is shaped like a little pumpkin and has a deep yellow-orange center and dark, bumpy green skin with celery-colored markings. Kabocha squash makes a rich, delectable soup that doesn’t need any milk or cream to enhance its flavor. In my opinion, adding dairy to this soup takes away from the depth of the kabocha’s fabulous flavor, which is beautifully complemented with the addition of curry powder.
Most of us have curry powder in our spice cabinets. Even though there are curry leaves for cooking, ground curry powder is an interesting blend of various spices and seeds, with a range of taste from mild to much hotter. The spice tumeric is the main ingredient, giving curry powder its dark golden color. Different versions will also include spices like cumin, coriander, fenugreek, seeds like celery and caraway, pepper and even garlic.
Muchi curry is the most complex blend and has the hottest flavor, due to the addition of black, white and cayenne peppers. If you prefer a more mild taste, then use a curry blend that has just a few ingredients.
I use Muchi curry for this soup because I like the addition of the three peppers, as well as its other spices and seeds that produce a deliciously intriguing taste that delivers a good amount of punch. Because I use only a few other ingredients for making this soup, it’s an uncomplicated dish to prepare and one that will receive rave reviews. I served it to someone who doesn’t like any squash, and he loved it.
Feel free to use whatever curry powder blend you have in your cabinet — it will still be delicious. If you choose to use a milder curry, you might need to add some ground pepper for added taste.
Kabocha squash is not easily found in most stores. The Japanese grocery store, Uwajimaya, consistently has a plentiful supply of them, especially during this time of year.
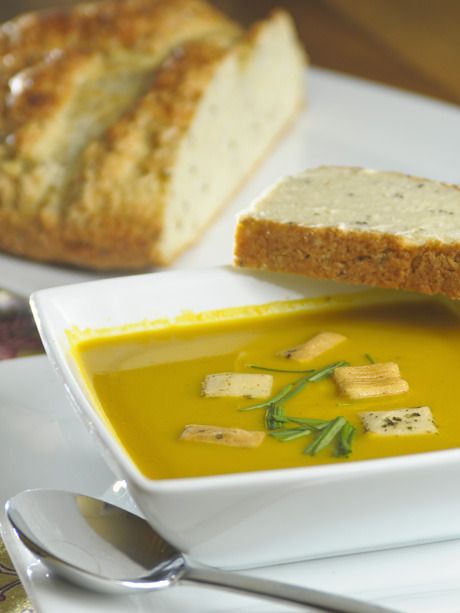
Kabocha Squash Soup
Serves 6 to 8
Ingredients:
2 kabocha squashes (3 ½ to 4 pounds total)
1 medium yellow onion, chopped
3 large garlic cloves, chopped
2 tablespoons butter
2 teaspoons Muchi curry powder (I found it at Whole Foods)
1 teaspoon salt
1 quart low sodium chicken broth
2 cups water
Optional Garish:
Japanese rice crackers (Trader Joe’s has them for the best price and doesn’t use MSG)
Chives (snipped)
Wash and coat each whole kabocha squash with olive oil and roast on a baking sheet for about an hour at 350 degrees or until you can easily pierce it with a knife. This step can be done ahead of time, which I often do the night before and then refrigerate. When the squash is cool enough to handle, cut it in half, and remove and discard the seeds and skin. Place the scooped-out flesh in a bowl.
In a soup pot, melt the butter on medium-high heat and sauté the onions until they soften. Stir in the garlic and curry powder and cook altogether for about a minute while stirring. Heating the curry powder first brings out the flavor even more.
Pour in the chicken broth, water and salt, and bring to a boil. Add the squash and lower the heat to a simmer. Cover and cook for 45 minutes or until the squash is very tender when pierced.
Pour the soup mixture in a large bowl. Rinse out the soup pot. Puree the soup in batches in a blender, filled halfway to avoid burning yourself. Pour each pureed batch of soup back into the soup pot; reheat and adjust any spices to taste.
When serving, you can garnish with little Japanese rice crackers and snipped chives.
Not only is stew a traditional comfort food, but it is also a great way to do a one-pot meal and not have to stress about timing different courses. This is especially appreciated when you have guests to entertain. Stews might take a little bit of prep time to get going, but after that you’ve got time to make a salad and relax.
For this easy-to-prepare chicken stew recipe, I use only dark meat with the bone in for its moistness. To reduce the fat, remove the chicken skin and leave on the bone.
Chicken Stew
Serves 6
3½ to 4 pounds chicken thighs (skin on and bone in)
2 tablespoons butter
1 small onion or ½ of a large one, finely chopped
3 tablespoons flour
2 cups chicken broth
4 medium carrots, peeled and sliced)
1½ to 2 cups fingerling potatoes (sliced into bite-sized pieces)
1 cup frozen peas (don’t defrost)
2 teaspoons fresh thyme (removed from twigs and chopped)
Salt and fresh ground pepper to taste
Italian parsley for garnishing (optional)
Remove the skin on the chicken thighs and keep the bone on. Rinse well under cold water, pat dry and sprinkle with salt and pepper. In either a Dutch oven or a heavy stock pot, melt the butter on medium and sauté the chicken until lightly golden: about 5 minutes on each side. You might have to do this in a couple of batches, depending on the size of your pot. Add more butter if needed. Transfer the browned chicken on a plate while you go to the next step.
Add the chopped onion to the pot and sauté until tender for about 3 minutes. Make sure there are a few tablespoons of melted fat still in the pot. If not, add some more butter. When the butter is melted, sprinkle the flour over the onions and very quickly stir it around for about a minute to absorb all the liquid. Slowly add the chicken broth just a little bit at a time, as you very thoroughly and quickly whisk the flour with the broth, making sure you have removed any lumps. This first step needs to be done well before you add any more of the broth, as you are creating gravy, which you want to be smooth without any lumps. Add more broth, about a half cup at a time. Continue to stir well and cook on medium-high for about 2 minutes as it thickens, then stir in the herbs and adjust the salt and pepper to taste.
Reduce the heat to medium-low and add the carrots, potatoes, peas, then the browned chicken, spooning the gravy over them. Cover the pot tightly and cook for another 45 minutes. Before serving, take out the chicken thighs, remove the bones with a fork and knife, then put the cut-up chicken meat back in the pot and stir everything together.
To serve, spoon into bowls and garnish with chopped Italian parsley.
Irish Soda Bread
One 9-inch round loaf
Stews and soups just naturally team up well with a wonderful loaf of bread.
3½ cups all-purpose flour
1 teaspoon baking soda
½ teaspoon salt
½ tablespoon baking powder
3 tablespoons sugar
4 tablespoons chilled butter, ½ cube, sliced and diced
1¼ cup buttermilk (plus a tablespoon for brushing on prior to baking)
1 egg, slightly beaten
2 tablespoons caraway seeds
Preheat the oven to 375 degrees with the rack placed in the middle. Thoroughly butter a baking sheet or cover with parchment paper. You can also use a 9-inch spring-form cake pan that has been well-buttered, which I like to use because it contains the loaf better.
Place the flour, baking soda, salt, baking powder and sugar in the food processor or a big bowl; either pulse several times or whisk altogether to blend these dry ingredients. Add the diced, chilled butter cubes and pulse around 20 times until it resembles coarse meal; or use a pastry cutter, or two knives, or even just your finger tips to incorporate the butter into the flour. Then, if you’re using a food processor, transfer this mixture into a large bowl. Stir in the caraway seeds with a fork.
Stir the slightly beaten egg into the buttermilk. Make a well in the center of the flour mixture and pour the liquid in the well, then quickly mix with a fork just until blended, careful not to over-mix.
Use your hands to gather the dough in a ball and transfer to a floured surface. Knead the dough (just a few times), careful not to over-knead, which can cause the bread to be tough. Shape the dough into a disc, flatten the top and place onto the prepared baking sheet or cake pan. If, at any time, the dough is too moist to handle, just pat with a little more flour.
With a sharp knife, mark a ½-inch-deep cross over the entire top to prevent the bread from cracking while baking. Scoring the top this way also helps the heat get inside the dough while it is baking. If you’re using a 9-inch spring-form cake pan, remove the sides before you do the scoring step. Brush the top with a little buttermilk.
Bake for 45 to 50 minutes or until a cake tester comes out clean. Transfer to a wire rack to cool enough to slice. This bread also makes really delicious toast. Slice leftover bread and wrap well, prior to freezing to use as needed. Soda bread is best eaten within a day or two for the best taste.
Stay warm, take extra good care and enjoy!
Cynthia Shifrin can be contacted at cyns0117@aol.com.